🎉 React基础
1. props和state
构造函数中定义 props 和 state ,Props是只读属性,传递给组件以呈现UI和状态, state是私有的,并且完全受控于当前组件
class Clock extends React.Component {
  constructor(props) {
    super(props);
    this.state = {date: new Date()};
  }

  render() {
    return (
      <div>
        <h1>Hello, world!</h1>
        <h2>It is {this.state.date.toLocaleTimeString()}.</h2>
      </div>
    );
  }
}
没有 state 的组件叫无状态组件(stateless component),设置了 state 的叫做有状态组件(stateful component)
- 有状态组件
class HelloWorld extends Component {
  constructor() {
    super()
  }

  sayHi () {
    alert('Hello World')
  }

  render () {
    return (
      <div onClick={this.sayHi.bind(this)}>Hello World</div>
    )
  }
}
- 无状态组件(用函数式组件的编写方式)
函数式组件只能接受 props 而无法像跟类组件一样可以在 constructor 里面初始化 state
const HelloWorld = (props) => {
  const sayHi = (event) => alert('Hello World')
  return (
    <div onClick={sayHi}>Hello World</div>
  )
}
应当尽量多地写无状态组件,尽量少地写有状态的组件。这样会降低代码维护的难度,也会在一定程度上增强组件的可复用性
state 是让组件控制自己的状态,props 是让外部对组件自己进行配置。
2. setState回调函数
注意:
- 不要直接修改 State --- 通过setState()进行更改state
- State 的更新可能是异步的 --- setState()是一个异步函数
- State 的更新会被合并 --- 调用 setState() 的时候,React 会把你提供的对象合并到当前的 state
setState是一个异步函数,当使用ref时会比setState要先执行,这时候使用setState回调函数可以规避这个异步操作
handleClick (e) {
    this.setState({
      value: e.target.value
    }, () => {
      console.log(this.ul.querySelectorAll('div').length)
    })
}
3. React新旧生命周期
3.1 React v16.3之前的的生命周期:
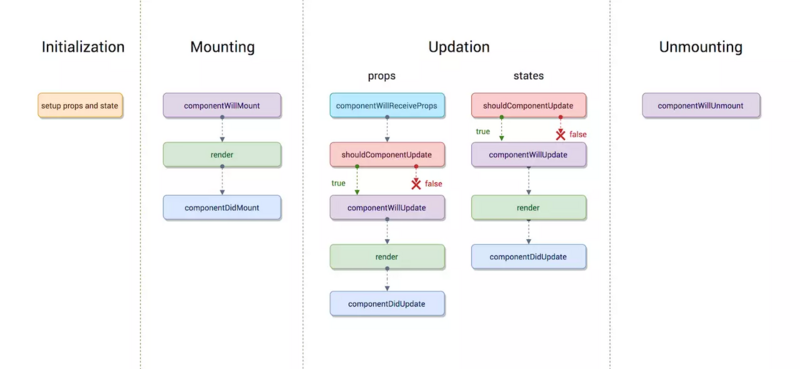
3.1.1 Mounting阶段
Mounting阶段叫挂载阶段,伴随着整个虚拟DOM的生成,它里边有三个小的生命周期函数,分别是:
- componentWillMount : 在组件即将被挂载到页面的时刻执行。
- render : 页面state或props发生变化时执行。
- componentDidMount : 组件挂载完成时被执行。
执行顺序:constructor --> componentWillMount --> render --> componentDidMount -->
componentWillMount和componentDidMount这两个生命周期函数,只在页面刷新时执行一次,而render函数是只要有state和props变化就会执行
3.1.2 Updation阶段
shouldComponentUpdate函数会在组件更新之前,自动被执行,它要求返回一个布尔类型的结果,必须有返回值(返回true,就同意组件更新;返回false,就反对组件更新)componentWillUpdate函数在组件更新之前,但shouldComponenUpdate函数之后被执行。但是如果shouldComponentUpdate函数返回false,这个函数就不会被执行了componentDidUpdate在组件更新之后执行,它是组件更新的最后一个环节
执行顺序:shouldComponentUpdate(组件发生改变前执行) --> componentWillUpdate(组件更新前,shouldComponentUpdate函数之后执行) --> render --> componentDidUpdate(组件更新之后执行)
componentWillReceiveProps 子组件接受props,执行该生命周期
shouldComponentUpdate(nextProps, nextState, nextContext) {
    if (nextProps === xxx) {
      return true
    } else {
      return false
    }
}
3.2 React16.3之后的生命周期示意图:
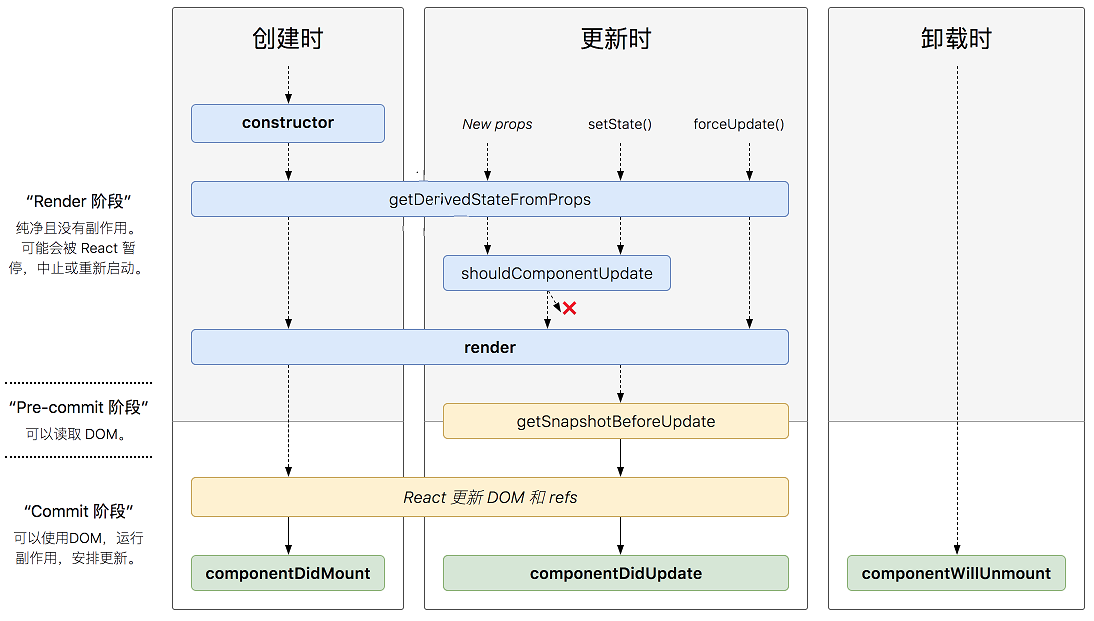
3.2.1 getDerivedStateFromProps(props, state)
当组件的state需要根据props来改变的时候可调用此方法。这个方法是在 render() 前会被执行,每次触发render前,都会触发此方法。
该方法有两个参数props和state; 返回值为state对象, 不需要返回整体state,把需要改变的state返回即可。如果不需要,可以返回null.
执行顺序:getDerivedStateFromProps() --> render() --> componentDidMount() -->
3.2.2 showComponentUpdate()
在渲染新的props或state前,shouldComponentUpdate被调用,默认返回true
若 shouldComponentUpdate() 返回 false ,则getSnapshotBeforeUpdate(), render() 和 componentDidUpdate()不会被执行。
利用 shouldComponentUpdate 进行
优化性能
3.2.3 getSnapshotBeforeUpdate(prevProps, prevState)
在render()的输出被渲染到DOM之前被调用,该生命周期返回的任何值都将作为第三个参数传递给componentDidUpdate()
3.2.4 componentDidUpdate(prevProps, prevState, snapshot)
在更新发生后调用 componentDidUpdate(),如将当前的props与以前的props进行比较
例如:
- 如果props没有改变,则可能不需要网络请求。
- 如果组件使用 getSnapshotBeforeUpdate(),则它返回的值将作为第三个参数传递给 componentDidUpdate()。否则,这个参数是undefined。
执行顺序:shouldComponentUpdate返回true --> getSnapshotBeforeUpdate --> componentDidUpdate
3.2.5 Unmounting阶段
componentWillUnmount函数时组件从页面中删除的时候执行
4. 性能优化
使用
shouldComponentUpdate函数优化性能
shouldComponentUpdate有两个参数:
- nextProps: 变化后的属性
- nextState: 变化后的状态
shouldComponentUpdate (nextProps, nextState) {
    if (nextProps.content !== this.props.content) {
        return true
    } else {
        return false
    }
}
5. 异常捕捉
React 16 将提供一个内置函数
componentDidCatch,如果 render() 函数抛出错误,则会触发该函数,错误在渲染阶段中被捕获,但在事件处理程序中不会被捕获
class ErrorBoundary extends React.Component {
  constructor(props) {
    super(props);
    this.state = { hasError: false };
  }

  componentDidCatch (error, info) {
    // Display fallback UI
    this.setState({ hasError: true });
    // You can also log the error to an error reporting service
    logErrorToMyService(error, info);
  }

  render() {
    if (this.state.hasError) {
      // You can render any custom fallback UI
      return <h1>Something went wrong.</h1>;
    }
    return this.props.children;
  }
}
componentDidCatch和getDerivedStateFromError区别:
如果异常发生在render阶段,React就会调用getDerivedStateFromError,如果异常发生在第commit阶段,React会调用componentDidCatch。
在render函数之前产生异常会调用 getDerivedStateFromError;
在render函数之后产生异常会调用 componentDidCatch。
注意:componentDidCatch是不会在服务器端渲染的时候被调用的 而getDerivedStateFromError会
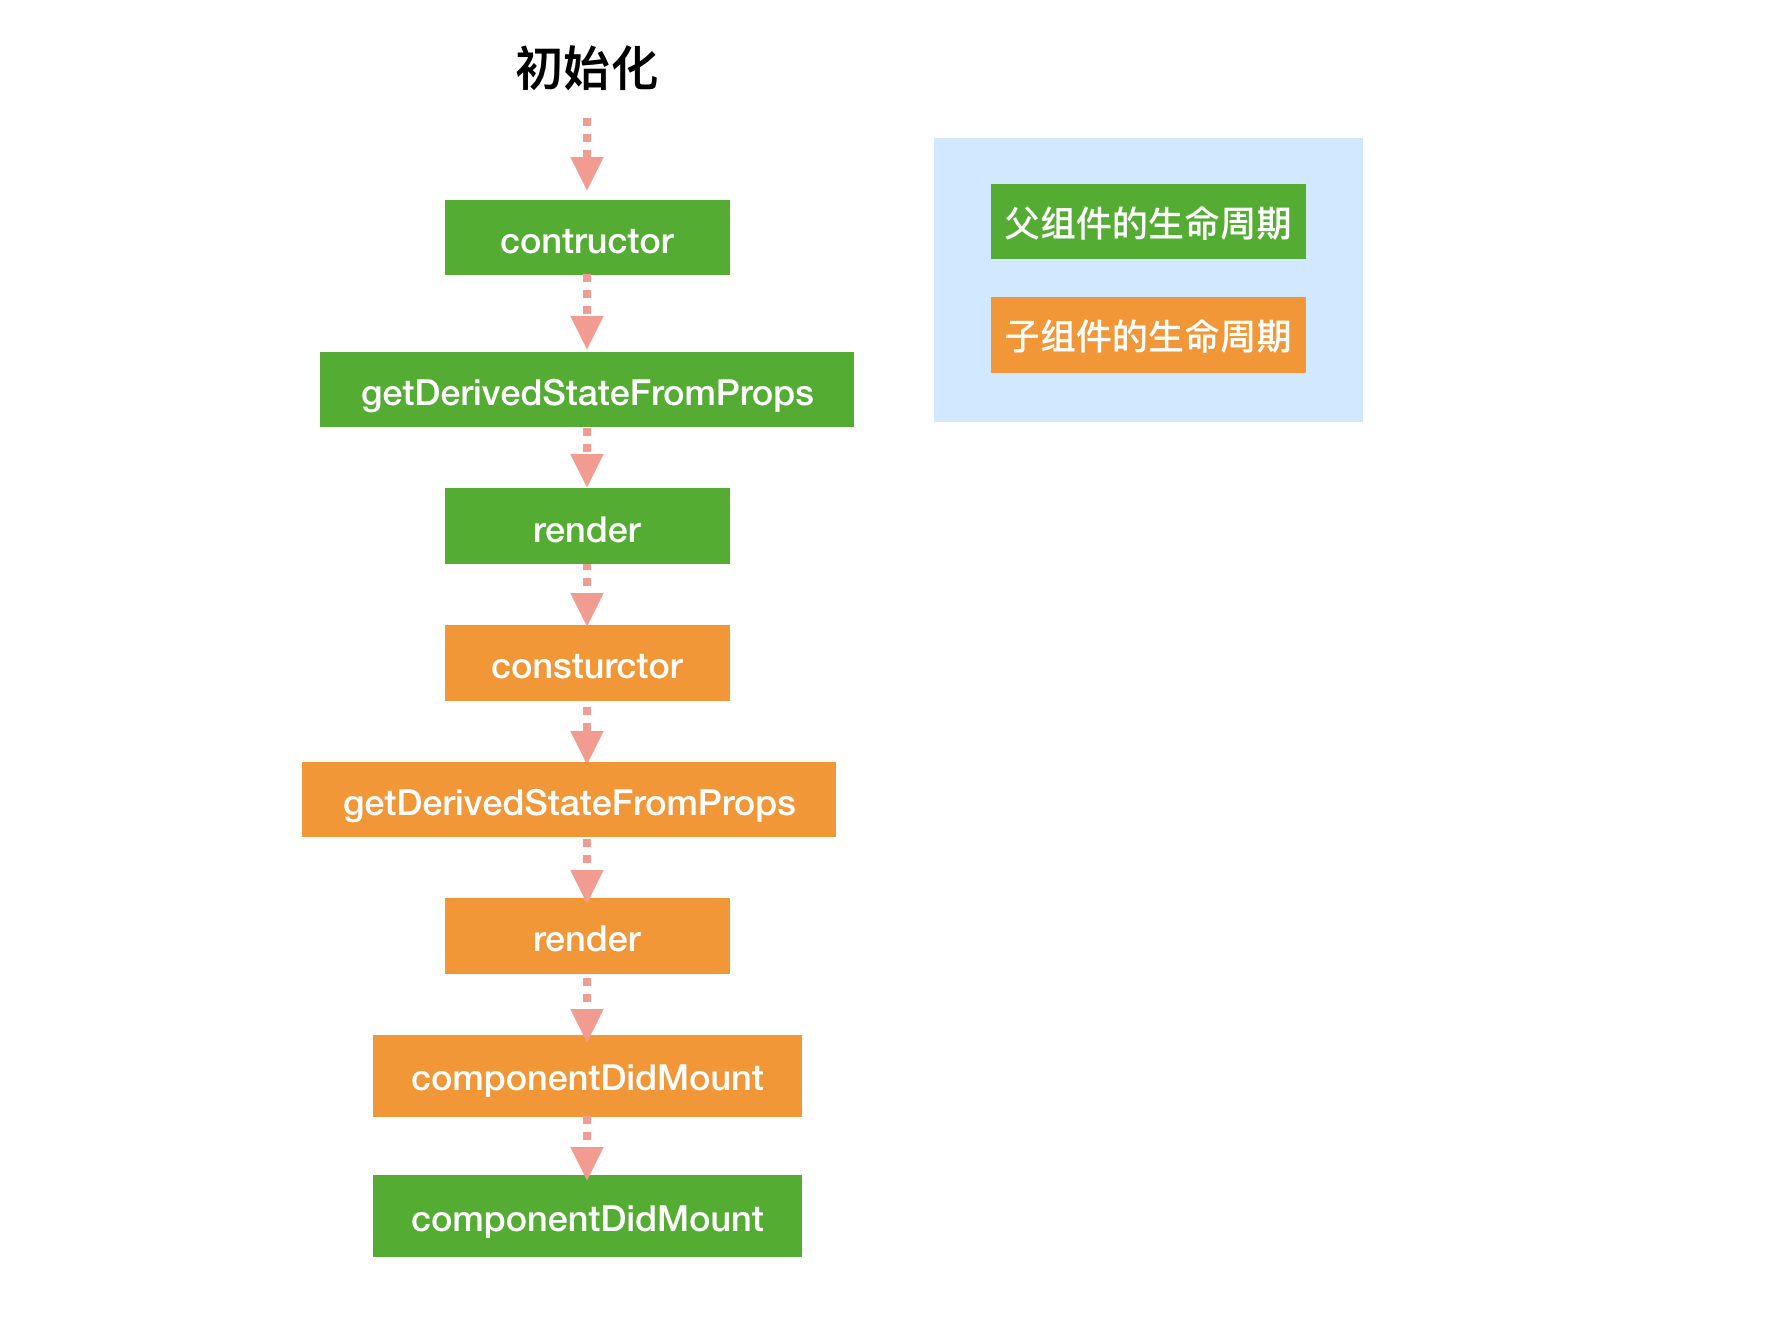
6. 父子组件生命周期:
初始化阶段(父组件和子组件):
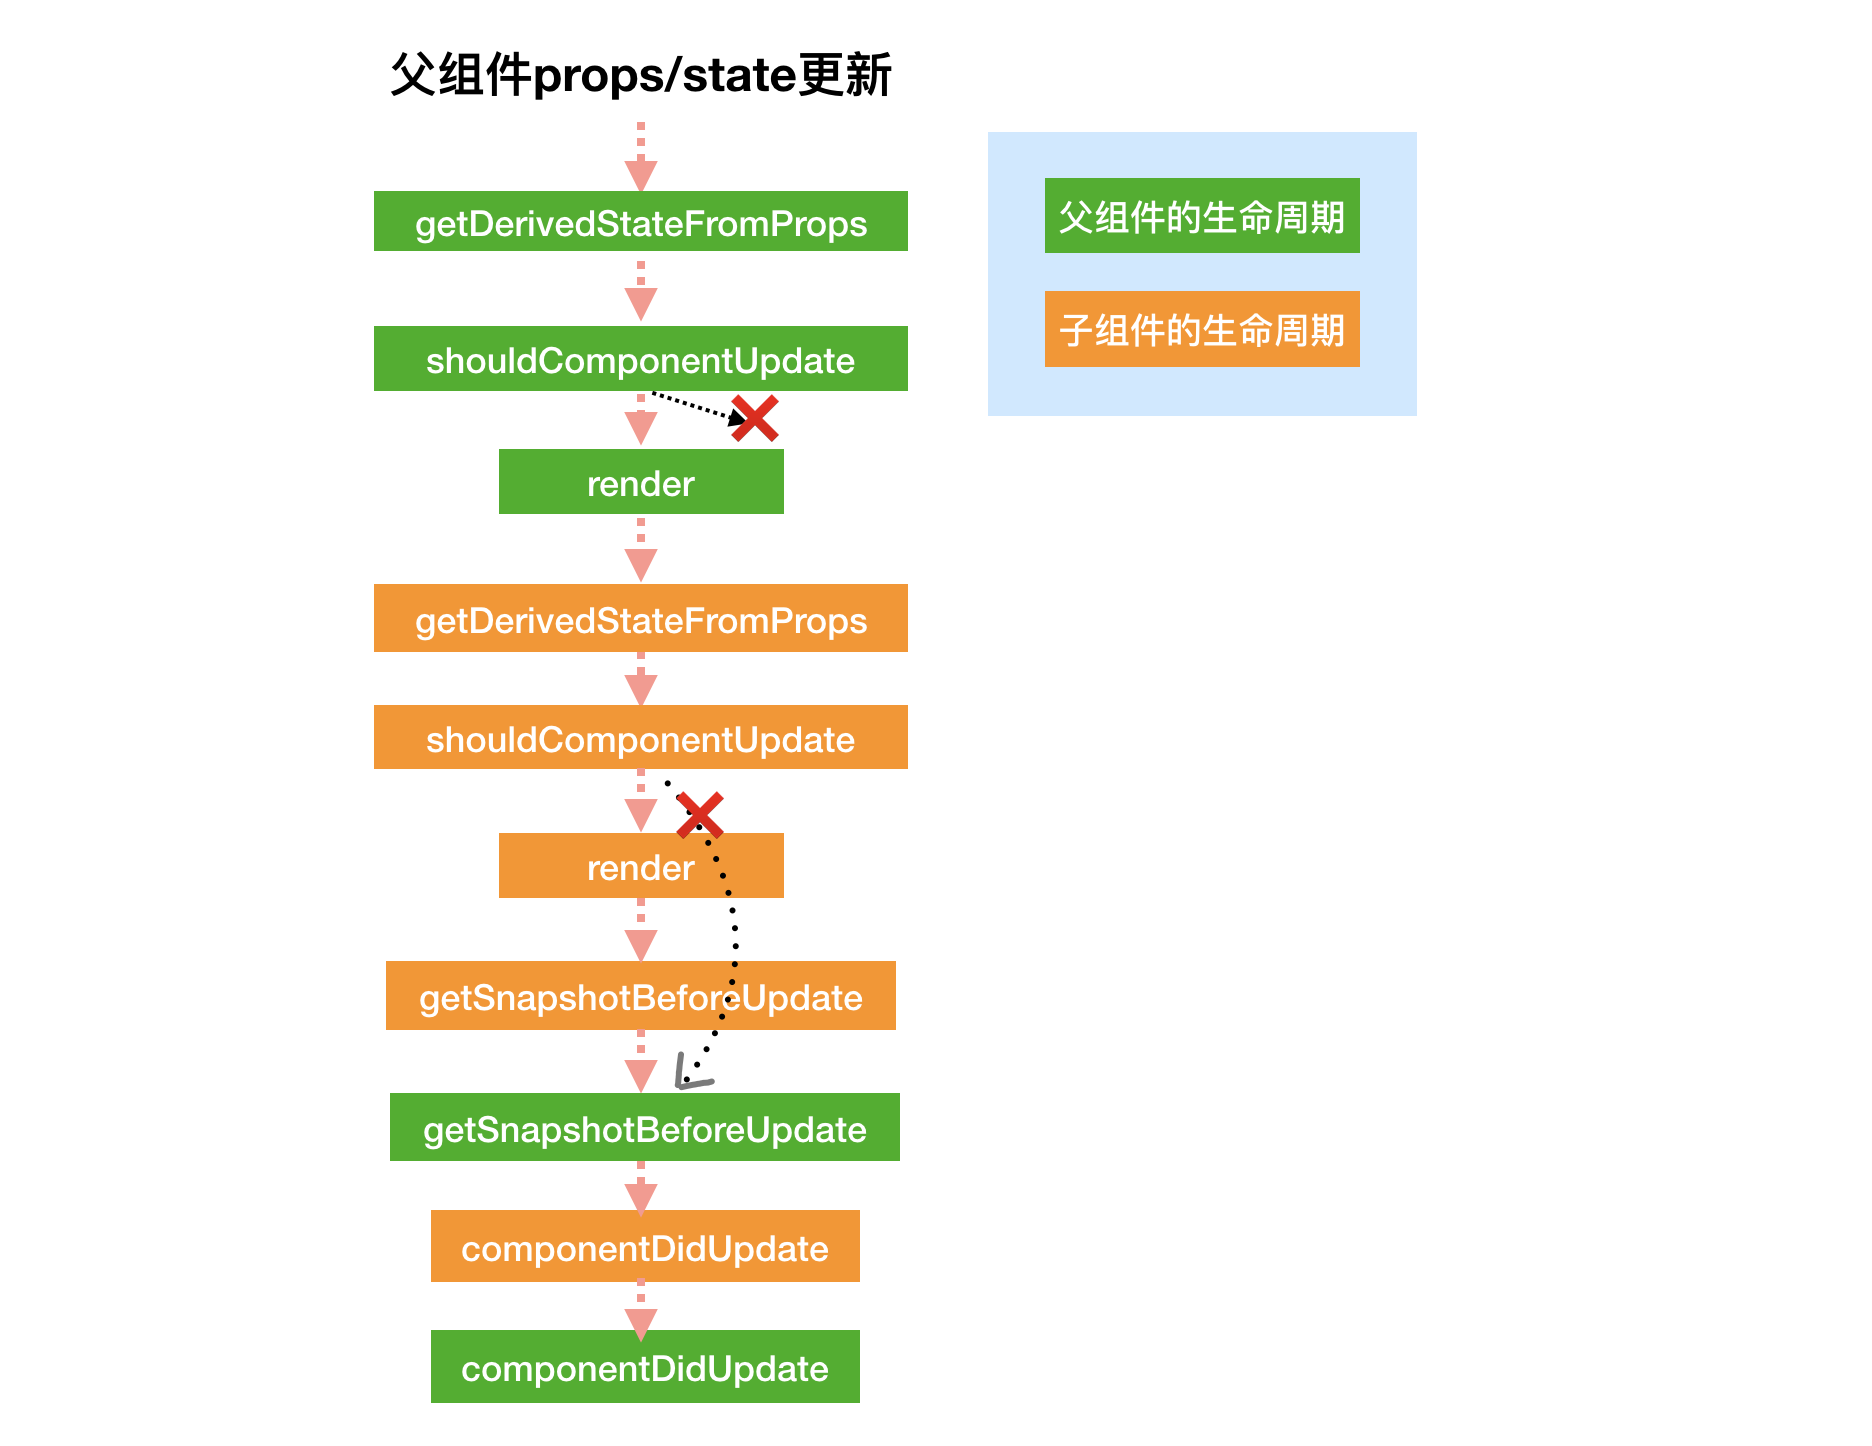
运行阶段:父组件props/state更新
子组件的shouldComponentUpdate返回false,则子组件其后的生命周期都不再进行,但是父组件的生命周期继续执行。
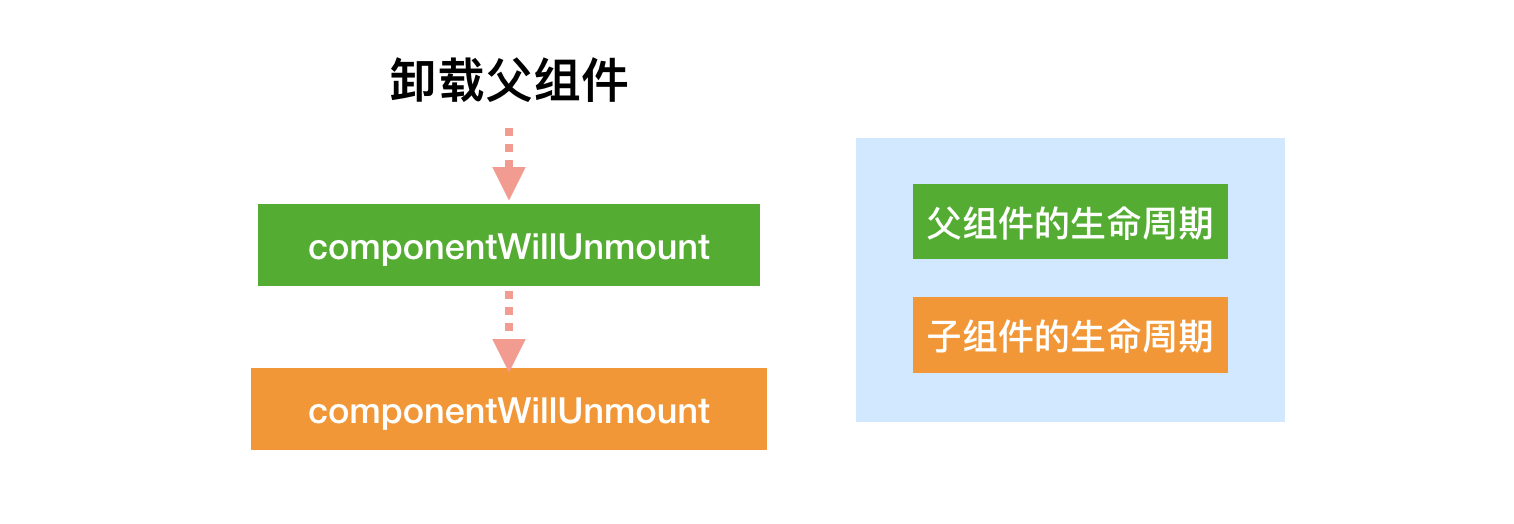
- 卸载阶段: 卸载父组件
7. PropType组件参数验证:
通过PropTypes给组件参数做类型限制,给组件加上propTypes,也让组件的开发、使用更加规范清晰。
详见官网PropTypes
7.1. 基本以及复杂类型有:
  PropTypes.array
  PropTypes.bool
  PropTypes.func
  PropTypes.number
  PropTypes.object
  PropTypes.string
  PropTypes.node
  PropTypes.element
  ...
举例:
class demo extends Component {
  static propTypes = {
    name: PropTypes.string,
    index: PropTypes.number,
    Func: PropTypes.func,
    list: PropTypes.array
  }
}
7.2. 必传值的校验
在类型后面加上
isRequired
name: PropTypes.string.isRequired
8. dangerouslySetInnerHTML属性
可以动态设置元素的innerHTML,需要给dangerouslySetInnerHTML传入一个对象,这个对象的__html属性值就相当于元素的innerHTML
为啥不设置innerHTML呢?--> 设置 innerHTML 可能会导致跨站脚本攻击(XSS)
constructor (props) {
  super(props)
  this.state = {
    content: '<h1>hello world</h1>'
  }
}
render () {
  return (
    <div
      className='editor-wrapper'
      dangerouslySetInnerHTML={{__html: this.state.content}} />
  )
}
高阶组件(Higher-Order Components)
定义: 高阶组件就是一个函数,传给它一个组件,它返回一个新的组件